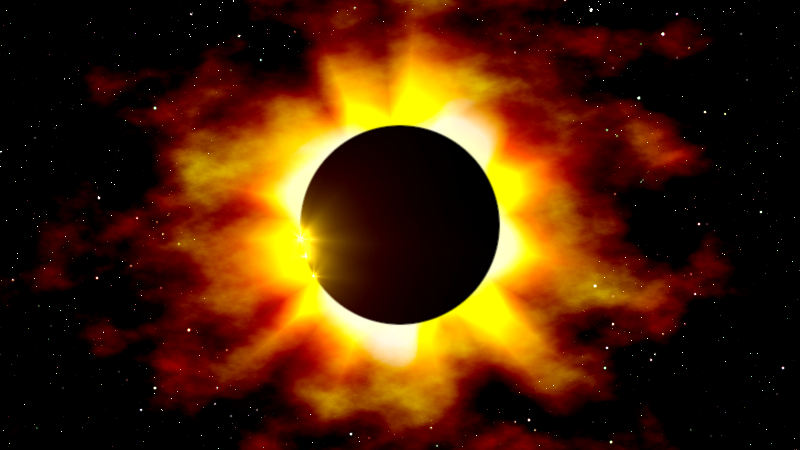
On this page I demonstrate how to construct a total solar eclipse. A total solar eclipse occurs when the New Moon passes directly in front of the Sun as seen from Earth. Because the Moon’s orbit is tilted with respect to the ecliptic (the orbital plane of Earth around the Sun), the New Moon usually passes a little above or below the disk of the Sun. However, if the New Moon is near a node — the point where the Moon’s orbit crosses the ecliptic — and the Moon is not too near apogee (the point in the lunar orbit most distant from Earth), then the dark disk of the Moon will partially or totally obscure the Sun. A total solar eclipse is one of Nature’s most spectacular events.
The techniques discussed below are adapted from a selection of online tutorials listed here.
TECHNICAL DETAILS: GIMP 2.10.18 on Ubuntu 20.04.2 1.7.0 LTS (August 2021)
TIP: Don’t be afraid to experiment with different settings in the windows and dialog boxes below. You can usually reverse a command by going to the Edit menu and selecting the Undo option.
TIP: Pay attention to which layer is currently active!
1. Preliminaries
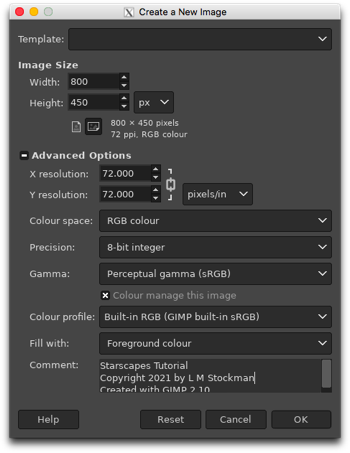
We begin by starting up GIMP and creating a new file. There are a variety of templates that you can use or you can just input your own dimensions and resolution. For instance, I have chosen a Width of 800 pixels and a Height of 450 pixels to give a 16:9 aspect ratio, plus a 72 pixels/inch Resolution since I don’t need high-definition. Most of the Advanced Options you can leave alone but make sure that you are working in the RGB Colour Space. Black is my default foreground colour so I have chosen to Fill my new image with that. The Comment section is for you to add whatever text you wish to have associated with your new file: image title, your name, copyright date, description, whatever. Press [OK] when you are happy with your choices and a new image will appear.
If your new image does not have a black background, then it is time to break out your Toolbox. In the Toolbox window, make black your foreground colour. Then use the Bucket Fill tool to fill in your image with the colour black.
Now make your background consisting of a basic star field and maybe a nebula or two.
2. Corona and Moon
When the Moon blocks the Sun’s disk, only then does the ghostly white corona surrounding the Sun appear to the naked eye.
2.1 New Layer
LAYER: Topmost layer
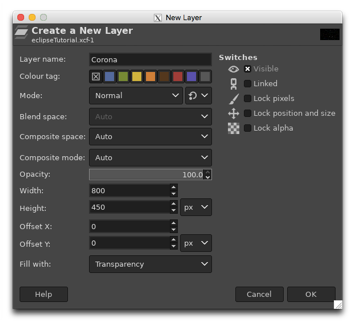
Add a transparent layer.
Image: Layer → New Layer
Name the layer ‘Corona’ and choose Transparency as the Fill with colour. The Mode should be Normal. Press [OK] when you are done.
2.2 Ellipse Selection
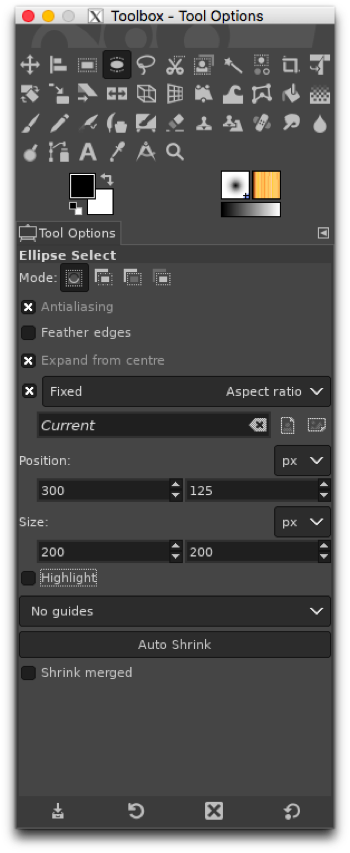
LAYER: Corona
Decide where you want to place your eclipsed Sun. Then, with the Ellipse Selection tool in the Toolbox window, create a circle centred at that point. Turn the feathering off.
Toolbox: Ellipse Selection
In this example, I have created a circle of radius 200 which is centred in my layer.
2.3 Bucket Fill
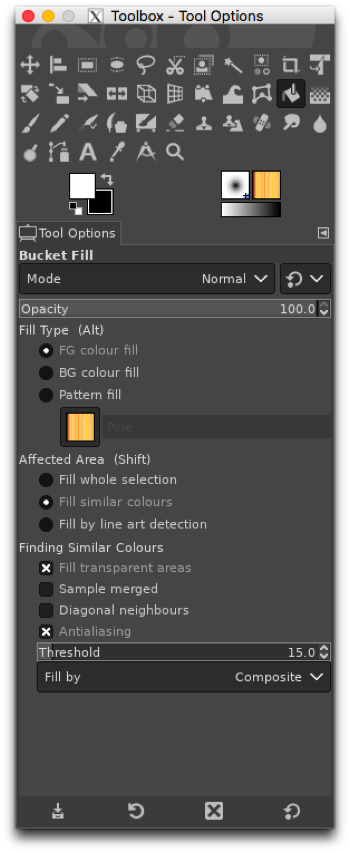
LAYER: Corona
If necessary, change the foreground colour to white. Then choose the Bucket Fill tool from the Toolbox window and use it to fill the circle selection with the colour white.
Toolbox: Bucket Fill
Remove the ‘marching ants’ surrounding the circle.
Image: Select → None
2.4 Duplicate Layer
LAYER: Corona
We now need a duplicate of our basic corona layer for our Moon.
Image: Layer → Duplicate Layer
Rename the duplicate layer ‘Moon’. You rename a layer by double clicking the name in the Layers window and typing in the new name, then pressing the <enter> key.
2.5 Invert
LAYER: Moon
We need to change the colour of the Moon’s disk from white to black. This is easily done from the Colours menu.
Image: Colours → Invert
We now have a black disk on top of a white disk. The image now appears as a black disk, possibly with a faint white outline, on top of a starry background.
2.6 Gaussian Blur
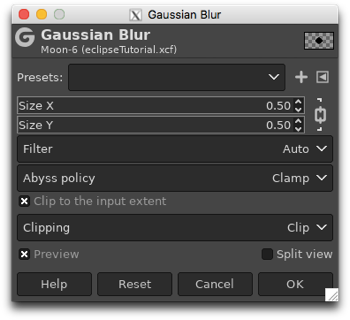
LAYER: Moon
The edge of the black circle is rather severe. Blur it slightly.
Image: Filters → Blur → Gaussian Blur
Choose a very small blur (I have chosen just 0.5 pixels in this example) and press [OK] when you are finished.
2.7 Ripple
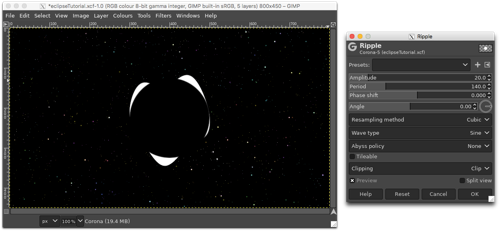
LAYER: Corona
The corona may be circular or irregularly shaped. We will construct an irregular corona using the Ripple distort.
Image: Filters → Distorts → Ripple
The dialog box has several important options. The Amplitude controls the height of the wave, the Period gives the wavelength and the Angle moves the waves around the edge. Choose a small Amplitude and adjust the Period to give some ripples around the edge. Press [OK] when you are finished. Then repeat the exercise with a different Amplitude and Period and change the Angle by at least 90°. You should end up with a slightly lumpy circle. In this example, I have applied the distortion twice using the following values:
- Amplitude : 20.0; Period : 140.0; Angle : 0.00
- Amplitude : 15.0; Period : 110.0, Angle : 90.00
2.8 Zoom Motion Blur

LAYER: Corona
The Zoom Motion Blur extends and blurs the edge of the lumpy circle.
Images: Filters → Blur → Zoom Motion Blur
In this example, I have chosen a Blurring factor of 0.200. Press [OK] when you are done.
NOTE: In earlier versions of GIMP, this effect is found in the Motion Blur filter. Choose the Zoom option.
3. Adding colour
Our next steps add both colour and movement to our image.
3.1 New Layer
See section 2.1 for more details.
LAYER: Corona
We need to add two new layers. Create the first new layer.
Image: Layer → New Layer
Name the layer ‘Colour Crush’ and choose either Foreground or Background as the Fill with colour, whichever is black. The Mode should be Overlay. Press [OK] when you are done. If the layer is not black, make sure the foreground colour is black and use the Bucket Fill tool to make the layer black.
Toolbox: Bucket Fill
If you did not set the Mode to Overlay when you created the layer, go to the Layers window and change it there. The purpose of this layer is to intensify and darken the colours below it.
Now create the second new layer.
Image: Layer → New Layer
Name the layer ‘Supernova’ and choose either Foreground or Background as the Fill with colour, whichever is black. The Mode should be Screen. Press [OK] when you are done. If the layer is not black, make sure the foreground colour is black and use the Bucket Fill tool to make the layer black.
Toolbox: Bucket Fill
If you did not set the Mode to Screen when you created the layer, go to the Layers window and change it there.
Now use the up or down arrows to place the layers in the following order (top to bottom):
- Moon (transparent, Normal)
- Colour Crush (black, Overlay)
- Corona (transparent, Normal)
- Supernova (black, Screen)
- starry background layers
3.2 Supernova
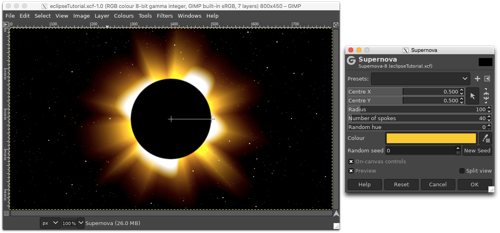
LAYER: Supernova
We will use the Supernova filter to add rays emanating from the Sun as well as colour.
Image: Filters → Light and Shadow → Supernova
Make sure that the Preview box is checked. Nearly all of the options in the dialog box will need to be altered. The Centre X/Y boxes give the coordinates of the supernova, the Radius controls the size of the central star, the Number of spokes determines how many rays will emanate from the central star, and the Colour describes the main colour of the glow. Enter the coordinates of the supernova (how you do this depends upon which version of GIMP you are running) and then adjust the descriptive aspects of the supernova until you are satisfied with the results. Press [OK] when you are finished. In this example, I have increased the Radius to 100 and reduced the Number of spokes to 40. I have chosen a yellow colour (HTML notation ffcc00) for the Colour of the rays. The supernova should be centred behind the black disk/corona.
To see the effect of the Colour Crush layer, try turning it off and on a few times (this is done by clicking on the ‘eye symbol’ next to the layer in the Layers window). The glow of the supernova is much reduced and the colours intensified with the use of the black overlay.
3.3 [optional] Colour Levels
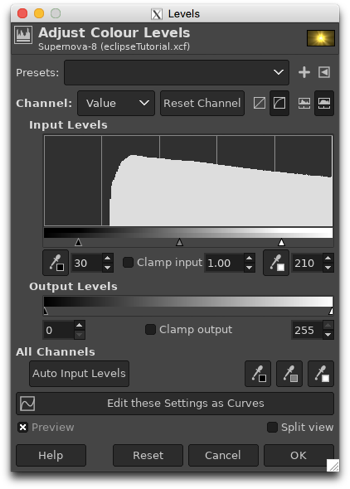
LAYER: Supernova
If you wish, you may adjust the colours of your supernova.
Image: Colours → Levels
In the dialog box, there are a number of options, but the most important ones are the Input Levels. The black triangle slider (first text box) determines the black point. All values below this are converted to black. Permitted values range from 0 to the white point. The white triangle slider (third text box) determines the white point. All values above this are converted to white. Permitted values range from the black point to 255. The grey triangle slider (second text box) controls the grey point. Make sure that the Preview box is checked, then decrease the white point and increase the black point to achieve the desired ring brightness and contrast. Press [OK] when you are finished
In this example, I have used a black point of 30 and a white point of 210 in the Value Channel to reduce some of the supernova glare. I have also selected the Red Channel and slightly altered the Output Levels (located below the Input Levels).
NOTE: There are four buttons following the Channel options. The first two switch between linear and perceptual (non-linear) modes and the last two switch between linear and logarithmic histograms in the Input Levels. I usually use perceptual mode and logarithmic histograms.
Further colour adjustment may be accomplished through the use of the Colour Balance option in the Colours menu.
3.4 New Layer
See section 2.1 for more details.
LAYER: Supernova
Some stars may be visible through the inner parts of the corona. To remove these stars, create a new layer.
Image: Layer → New Layer
Name the layer ‘Block Stars’ and choose Transparency as the Fill with colour. The Mode should be Normal. Press [OK] when you are done. Then use the down arrow to place it between the starry background layers and the Supernova layer.
3.5 Ellipse Selection / Bucket Fill
See sections 2.2 and 2.3 for more details.
LAYER: Block Stars
We will create a black circle to block out the stars. Use the Ellipse Selection tool to create a circle that is centred on the eclipse and large enough to block out the unwanted stars shining through the inner corona.
Toolbox: Ellipse Selection
A small bit of feathering is probably a good idea. Once the circle is ready, make sure that black is your foreground colour and use the Bucket Tool to fill the circle with the colour black.
Toolbox: Bucket Tool
Once you are satisfied with the result, remove the ‘marching ants’ around the circle.
Image: Select → None
3.6 New Layer
See section 2.1 for more details.
LAYER: Corona
Create a new layer which will sit above the Corona layer but below the Colour Crush layer
Image: Layer → New Layer
Name the layer ‘Clouds’ and choose Transparency as the Fill with colour. The Mode should be Soft Light. Press [OK] when you are done. If you did not set the Mode to Soft Light when you created the layer, go to the Layers window and change it there.
3.7 Solid Noise
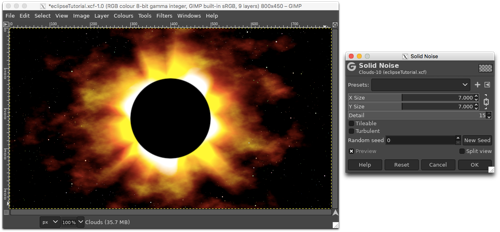
LAYER: Clouds
Now add a bit of texture to the outer parts of the corona.
Image: Filters → Render → Noise → Solid Noise
There are a number of options in the dialog box, including the X/Y Size (the relative size of the blobs), Detail (how much fine detail there is within a blob) and Seed (for randomisation). Choose values for the Size and Detail and press the Seed button until you get a pattern that you like. Press [OK] when you are finished. In this example, I have chosen a Size of 7.0 and a maximum Detail of 15.
3.8 [optional] Erase
LAYER: Clouds
Use the Eraser from the Toolbox window to erase any unwanted clouds near the edges of the image or to reshape the outer corona.
3.9 [optional] Opacity
In the Layers window, adjust the Opacity of various layers (Supernova, Corona, Clouds) until you get the results that you want. In this example, I have slightly reduced the opacity of the Corona layer so that the white is not so overpowering.
4. Diamond ring effect
Also known as “Baily’s Beads” after English astronomer Francis Baily (1774–1844) who described them in 1836, the diamond ring effect is a feature of total solar eclipses. Because the Moon is not smooth, the Sun is able to shine through the rugged edges where there are craters or valleys in the seconds just before or just after totality.
4.1 New Layer
See section 2.1 for more details.
LAYER: Moon
Add one more black layer.
Image: Layer → New Layer
Name the layer ‘Beads’ and choose either Foreground or Background as the Fill with colour, whichever is black. The Mode should be Screen. Press [OK] when you are done. If the layer is not black, make sure the foreground colour is black and use the Bucket Fill tool to make the layer black.
Toolbox: Bucket Fill
If you did not set the Mode to Screen when you created the layer, go to the Layers window and change it there.
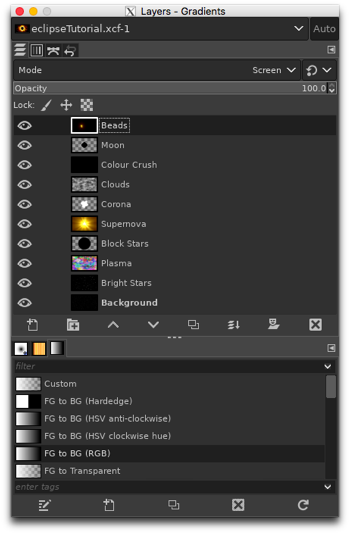
The layers should be in the following order (top to bottom):
- Beads (black, Screen)
- Moon (transparent, Normal)
- Colour Crush (black, Overlay)
- Clouds (transparent, Soft Light)
- Corona (transparent, Normal)
- Supernova (black, Screen)
- Block Stars (transparent, Normal)
- starry background layers
4.2 Supernova
See section 3.2 for more details.
LAYER: Beads
To simulate the effect of Baily’s Beads, we will place one or more very small supernovae right on the edge of the black disk. Use the same colour as before but make the Radius very small (probably 15 or less) and adjust the Number of spokes to suit. The ‘beads’ should be in the same quadrant, not scattered around the disk. In this example, I have place three tiny supernovae in the lower left quadrant.
4.3 Colour adjustments
See section 3.3 for more details.
LAYER: Beads
If you wish, use the Colour Balance and/or Levels in the Colour menu to fine-tune the colour of your beads.
5. Result
6. Closing Thoughts
In this example we have created a total eclipse of a solar-type star (a yellow star), but you can use the same effects with stars of other colours. Try it!