On this page I demonstrate two different ways to construct a rocky planet. Rocky planets (also known as terrestrial planets) have a solid surface, unlike a gaseous planet. Examples of rocky worlds include Earth, Mars, the Moon, Ganymede (a satellite of Jupiter), Titan (a satellite of Saturn), and Ceres (a dwarf planet in the asteroid belt). We shall concentrate on constructing spherical worlds but it is also possible to make them ellipsoidal.
The techniques discussed below are adapted from a selection of online tutorials listed here.
TECHNICAL DETAILS: GIMP 2.10.18 on Ubuntu 20.04.2 1.7.0 LTS (July 2021)
TIP: Don’t be afraid to experiment with different settings in the windows and dialog boxes below. You can usually reverse a command by going to the Edit menu and selecting the Undo option.
TIP: Pay attention to which layer is currently active!
1. Preliminaries
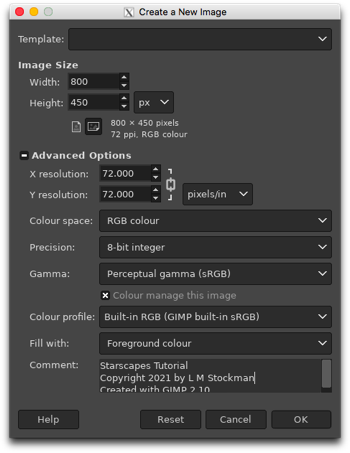
We begin by starting up GIMP and creating a new file. There are a variety of templates that you can use or you can just input your own dimensions and resolution. For instance, I have chosen a Width of 800 pixels and a Height of 450 pixels to give a 16:9 aspect ratio, plus a 72 pixels/inch Resolution since I don’t need high-definition. Most of the Advanced Options you can leave alone but make sure that you are working in the RGB Colour Space. Black is my default foreground colour so I have chosen to Fill my new image with that. The Comment section is for you to add whatever text you wish to have associated with your new file: image title, your name, copyright date, description, whatever. Press [OK] when you are happy with your choices and a new image will appear.
If your new image does not have a black background, then it is time to break out your Toolbox. In the Toolbox window, make black your foreground colour. Then use the Bucket Fill tool to fill in your image with the colour black.
Now make your background consisting of a basic star field and maybe a nebula or two, but take it easy on the supernovae for now!
2. Planet texture
For the planet, we will need a large, good-quality, high-resolution texture to use as the planet’s surface. You can create one yourself in GIMP or you can import an image. In the examples that follow, I have used this image as my planet texture.
However, it is certainly possibly to generate realistic textures using the many unusual brushes, filters and colour enhancements available in GIMP. Give it a try!
Open (or create) your planet texture image in GIMP and crop it into a square if necessary.
There are two basic methods for creating planets (beyond simply drawing them):
3. Technique #1: Warping a texture with a lens
This technique uses the lens effect to produce a planet from a pre-made texture.
3.1 New Layer
LAYER: Topmost layer
We begin by adding a new layer to the top of the stack.
Image: Layer → New Layer
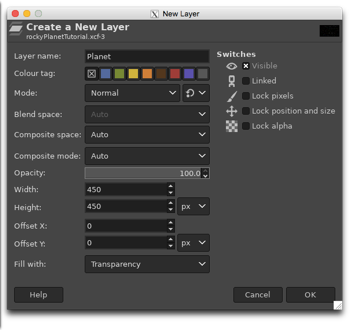
Name the layer ‘Planet’ and choose Transparency as the Fill with colour. Normally we do not change the dimensions of the new layer but merely use the dimensions of the image. In this instance, however, we need a square layer so choose both dimensions to be equal to one another. In this example, I have created a layer sized 450 pixels by 450 pixels.
LAYER: Planet
Go back to your planet texture image. Resize it to the same size as the Planet layer and copy it. The planet texture image is in GIMP’s Clipboard. Paste it into the new image.
Image: Edit → Paste
The copied planet texture appears as a Floating Selection (Pasted Layer) above the Planet layer. Anchor it to the Planet layer.
Image: Layer → Anchor Layer
Close the planet texture image. We are finished with it.
3.2 Lens
LAYER: Planet
Now we warp our flat square picture into a round one resembling a sphere.
Image: Filters → Distorts → Apply Lens
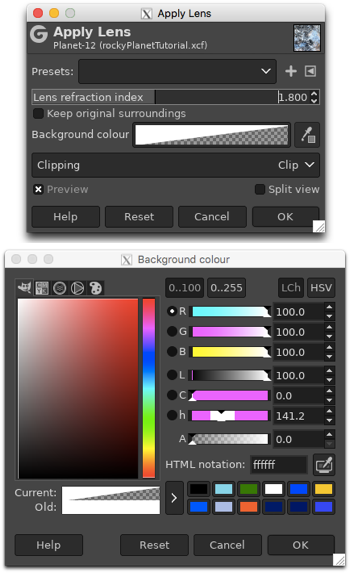
Check the Preview box and uncheck the Keep original surroundings option. Click on the Background colour bar and turn the alpha channel (labelled as A in the dialog box) down to zero to get full transparency. The Lens refraction index controls the simulated curvature. Try some different values to see the effect. In this example, I have used 1.800. Once you have something that you like, press [OK].
3.3 [optional] Rotate
LAYER: Planet
At the moment, the planet is fully illuminated and looks rather flat. To give it the illusion of depth, we will add a shadow, but we first have to decide how we wish the planet to be illuminated:
- new (not illuminated or dark)
- crescent (less than half-illuminated)
- half-illuminated
- gibbous (more than half-illuminated)
- full (completely illuminated)
We also need to decide how the planet should be orientated relative to the shadow. Rotate the planet around its centre to ensure that the most interesting features will not be in shadow.
Image: Tools → Transform Tools → Rotate
With the Preview box checked, try different values for the Angle (in degrees) to get the planet orientated to perfection. Press [OK] when you are satisfied.
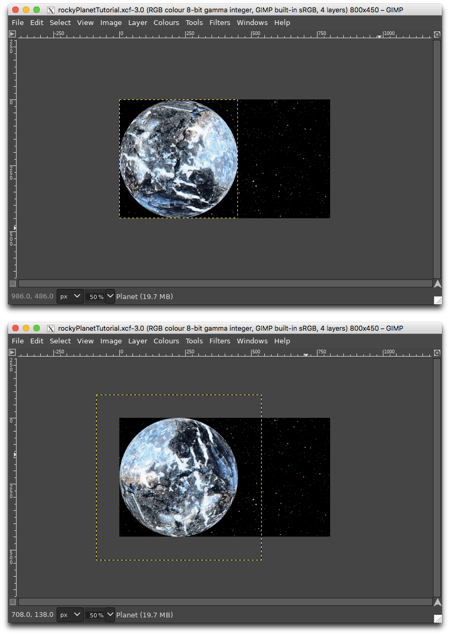
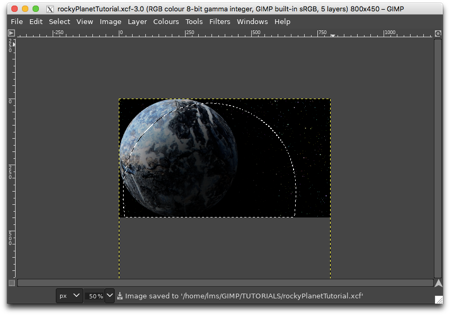
In this example, we are creating a planet in its crescent phase, with the illumination coming from the upper left side. Our planet texture already has a bright spot on it so we rotate it around to where the illuminated side of the planet will eventually be. Notice the yellow dotted line. That is the outline of the layer. Rotation of anything other than multiples of 90° will result in a larger layer.
3.4 New Layer
See section 3.1 for more details.
LAYER: Planet
Now we add a new transparent layer for the shadow effect. It needs to be much larger than the original Planet layer so that the curve of the shadow will look realistic. In this example, I have created a layer sized 800 pixels by 800 pixels.
Image: Layer → New Layer
Name the layer ‘Planet Shadow’ and choose Transparency for the Fill with colour.
3.5 Ellipse Selection / Move / Feather / Bucket Fill
LAYER: Planet Shadow
Because the Planet Shadow layer is larger than the image, it is useful to zoom out in order to see the entire layer. You can do this from the Image window. At the bottom is the zoom button with values given in percentages. Adjust this down in order to see the entire layer. In this example, I have chosen 50%.
We wish to select a circle. This is done using the Ellipse Selection tool.
Toolbox: Ellipse Selection
Click near one corner and drag the cursor down toward the opposite corner. It does not have to be a perfect circle.
If the shadow is not exactly in the right place, we may use the Move tool to adjust the placement of the shadow.
Toolbox: Move
You will need a large value for the feathering to avoid a solid black shadow. In the example I have chosen 250 pixels.
Image: Select → Feather
After ensuring that the foreground colour is black, use the Bucket Fill tool to fill in the ellipse.
Toolbox: Bucket Fill
3.6 Merge Down
LAYER: Planet Shadow
Once you are happy with the placement of the shadow, merge the shadow layer down onto the planet.
Image: Layer → Merge Down
We now have just one layer called Planet containing your shadowy planet. Remove any remaining selection ‘marching ants’ by selecting None.
LAYER: Planet
Image: Select → None
3.7 Ellipse Selection / Cut
LAYER: Planet
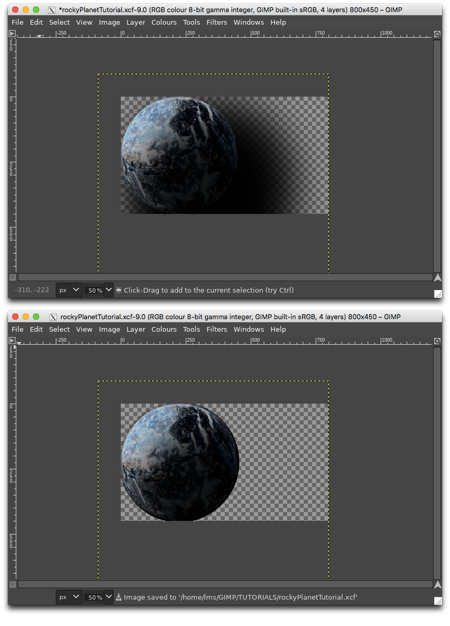
Temporarily hide all of the layers below Planet. This is done by clicking on the ‘eye symbol’ for each layer in the Layers window. You will notice that the layer contains both the planet and the shadow extending beyond the planet boundaries. This will look unnatural in the final image so we need to remove the excess shadow. We do this with the Ellipse Selection tool.
Toolbox: Ellipse Selection
Use this tool to create a circle the just contains the planet. You do not need to be exact but try to get as close to the planet’s surface as you can without clipping it. Once you are satisfied with your selection, invert it.
Image: Select → Invert
Now we need to delete the selection. This is done with the Cut command.
Image: Edit → Cut
We now should have only the planet (and possibly a very thin shadow near the surface) left on the layer. Make all of the other lower layers visible again by clicking on the space where the ‘eye symbol’ would be in the Layers window.
Remove the ‘marching ants’ along the selection line.
Image: Select → None
3.8 Scale Layer

LAYER: Planet
Our planet is too large so we will scale the layer down to the final size of the planet.
Image: Layer → Scale Layer
The dialog box shows the current size of the layer (which was formed from the rotated Planet layer and the much larger Planet Shadow layer). Decide how much smaller you want your planet to be and enter the width (or height). Make sure that the ‘chain’ to the right of the Width and Height boxes is unbroken so that the layer will scale equally in both directions. Press [OK] when you are finished.
Don’t panic! If you get the scaling wrong, you can undo it and try again. It may take several attempts before you get the size to your liking.
Image: Edit → Undo Scale Layer
In this example, my Planet layer has grown to 889 pixels by 889 pixels. I have reduced it to 350 pixels to 350 pixels (but it took a couple of tries before I found the dimensions that I liked).
3.9 Move
LAYER: Planet
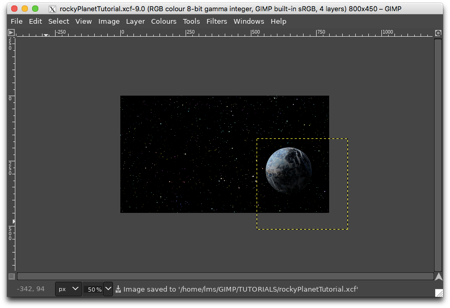
Now use the Move tool to move the Planet layer into its final position in the image.
Toolbox: Move
Click on your planet and drag it where you want it to its final position.
3.10 [optional] Rotate
See section 3.3 for more details.
LAYER: Planet
Now that the planet is in the correct place in the image, it may be necessary to rotate it again to get the illuminated surface in the correct orientation relative to where its sun will be.
Image: Tools → Transform Tools → Rotate
3.11 [optional] Layer to Image Size
LAYER: Planet
The Planet layer is a different size to the rest of the image. Resize it to match.
Image: Layer → Layer to Image Size
3.12 Supernova

LAYER: Planet
What is illuminating our planet? The light source of a planet in a full or gibbous phase is behind the observer and not in view, but the light source of a planet in a crescent or half-illuminated phase may be visible, depending on the placement of the planet. In our example, the crescent phase planet is in the lower right corner with the illuminated side pointing upwards and to the left, so that is where its sun is located. That is where we will locate a bright star using the Supernova filter. First, however, we will create a new transparent layer.
Image: Layer → New Layer
Call the new layer ‘Sun’.
LAYER: Sun
We will create the sun with the Supernova filter.
Image: Filters → Light and Shadow → Supernova
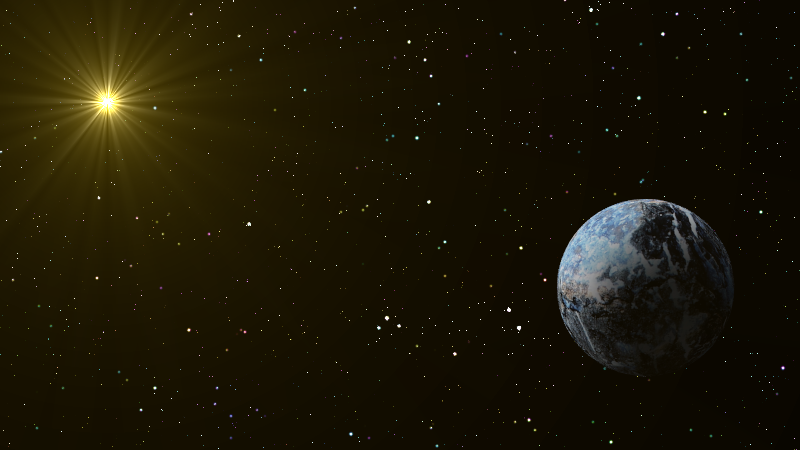
Make sure that the Preview box is checked. Nearly all of the options in the dialog box will need to be altered. The Centre X/Y boxes give the coordinates of the supernova, the Radius controls the size of the central star, the Number of spokes determines how many rays will emanate from the central star, and the Colour describes the main colour of the glow. Enter the coordinates of the supernova (how you do this depends upon which version of GIMP you are running) and then adjust the descriptive aspects of the supernova until you are satisfied with the results. Press [OK] when you are finished.
3.13 Result
4. Technique #2: Mapping a texture onto a sphere
This technique uses the mapping filter to turn a flat square into a seemingly three-dimensional sphere.
4.1 New Layer
Follow the instructions outlined in sections 2 and 3.1.
4.2 Map Object
LAYER: Planet
Image: Filters → Map → Map Object
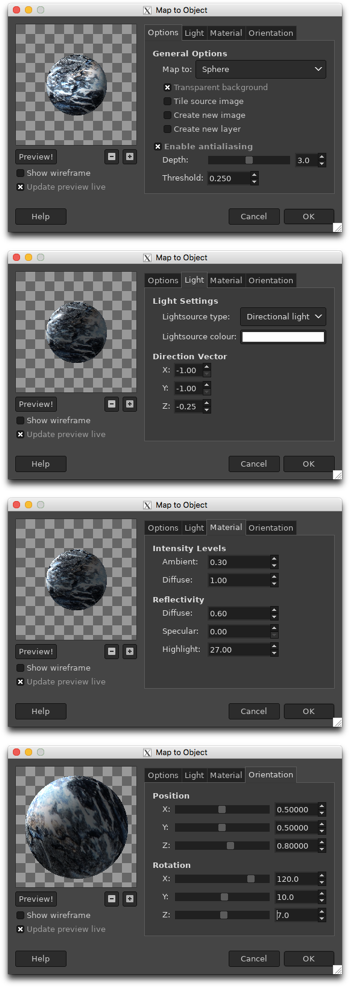
This filter has four dialog boxes: Options, Light, Material and Orientation. We will discuss each one in turn. First, however, uncheck the Show wireframe box and check the Update preview live box.
Image: Filters → Map → Map Object: Options
The Map To option should be set to Sphere. Check Transparent background.
Image: Filters → Map → Map Object: Light
Change the Lightsource type to Directional light. You may change the Lightsource colour by clicking on the colour box. The Direction Vector defines the position of the light source. The default value places the light source in the upper left corner and behind the observer, giving the sphere a gibbous appearance. In order to make a crescent phase, we will change the Z value to a negative value.
Image: Filters → Map → Map Object: Material
There are a number of options here. Experiment! However, to avoid a bright spotlight on the planet, turn Specular (under Reflectivity) to 0.
Image: Filters → Map → Map Object: Orientation
The Position adjusts the placement of the sphere in the layer. The X/Y values define the position of the centre and the Z value controls the radius. The Rotation controls which side of the planet faces us. Play with the values to get a pleasing aspect. Be aware that there may be an obvious ‘join’ on the far side of the sphere so be sure to keep that hidden. Press [OK] when you are finished.
4.3 Scale Layer
See section 3.8 for more details.
LAYER: Planet
Our planet is too large so we will scale the layer down to the final size of the planet.
Image: Layer → Scale Layer
Decide how much smaller you want your planet to be and enter the width (or height). Make sure that the ‘chain’ to the right of the Width and Height boxes is unbroken so that the layer will scale equally in both directions. Press [OK] when you are finished.
4.4 Move
LAYER: Planet
Follow the instructions outlined in section 3.9.
4.5 [optional] Rotate
LAYER: Planet
Follow the instructions outlined in section 3.10.
4.6 Supernova
LAYER: Planet
Follow the instructions outlined in section 3.12.
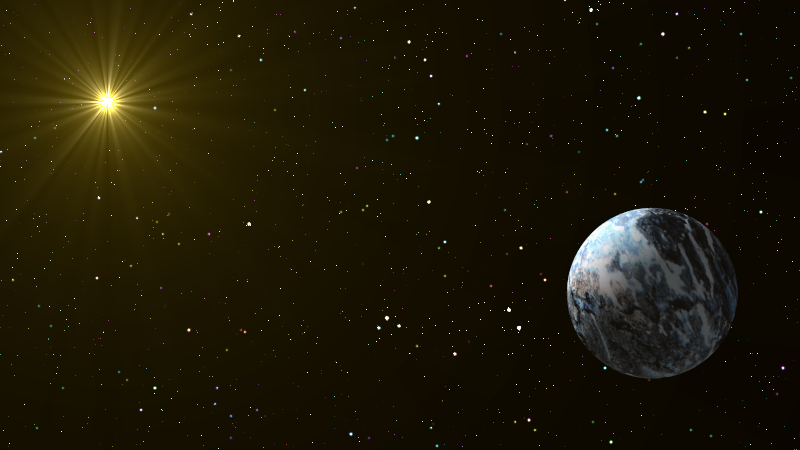
4.7 Result
5. Closing thoughts
You may find it easier to create your planet at a larger scale in a separate image. You can always scale and copy it over to your background image once it is ready.
For instructions on creating a planet in its gibbous phase, see the gas giants tutorial.
Most planets are actually oblate spheroids, meaning they are ellipsoidal with their equatorial diameter larger than their polar diameter. If you are using the lens technique, then you can create an ellipsoidal planet simply by making the planet layer rectangular (width larger than height) rather than square. However, this limits you in that your equator is then defined. For both techniques, it is probably simpler to create a spherical planet and scale it to the proper shape once you have it positioned to your satisfaction.
Image: Layer → Scale Layer
Make sure that the ‘chain’ to the right of the Width and Height boxes is broken so that the layer will scale independently in both directions. Then enter values for the Width and Height with Height < Width. Press [OK] when you are finished.
Unless it says otherwise, always assume that content — images, text, videos, etc. — found on the internet is protected by copyright. If you are using someone else’s photograph as the basis for your planet, make sure you have permission to do so, especially if you are sharing the image in a public forum.